AI Chatbot Widget
Add intelligent, conversational AI assistance to your website, powered by advanced language models. Create a custom assistant that understands your business and helps visitors around the clock.
Pricing 0.8 credit / chatYou can fully customize
Your AI assistant is powered by Claude and can be customized with your own knowledge base.
Quick Start
Copy the snippet for your stack and paste it into your project you're live in under a minute.
Paste this snippet into any HTML file before the closing </body> tag.
1<!-- 1. Add this where you want the chatbot to appear -->
2<div id="chatbot-root"></div>
3
4<!-- 2. Load the widget script -->
5<script src="https://cdn.widgetkraft.com/chatbot.js"></script>
6
7<!-- 3. Initialize with your Widget ID -->
8<script>
9  ChatbotWidget.init({
10    widgetId: "YOUR_WIDGET_ID"
11  });
12</script>YOUR_WIDGET_ID with the ID found in the Code tab of your chatbot editor.Creating an AI Chatbot widget
Four steps from the dashboard.
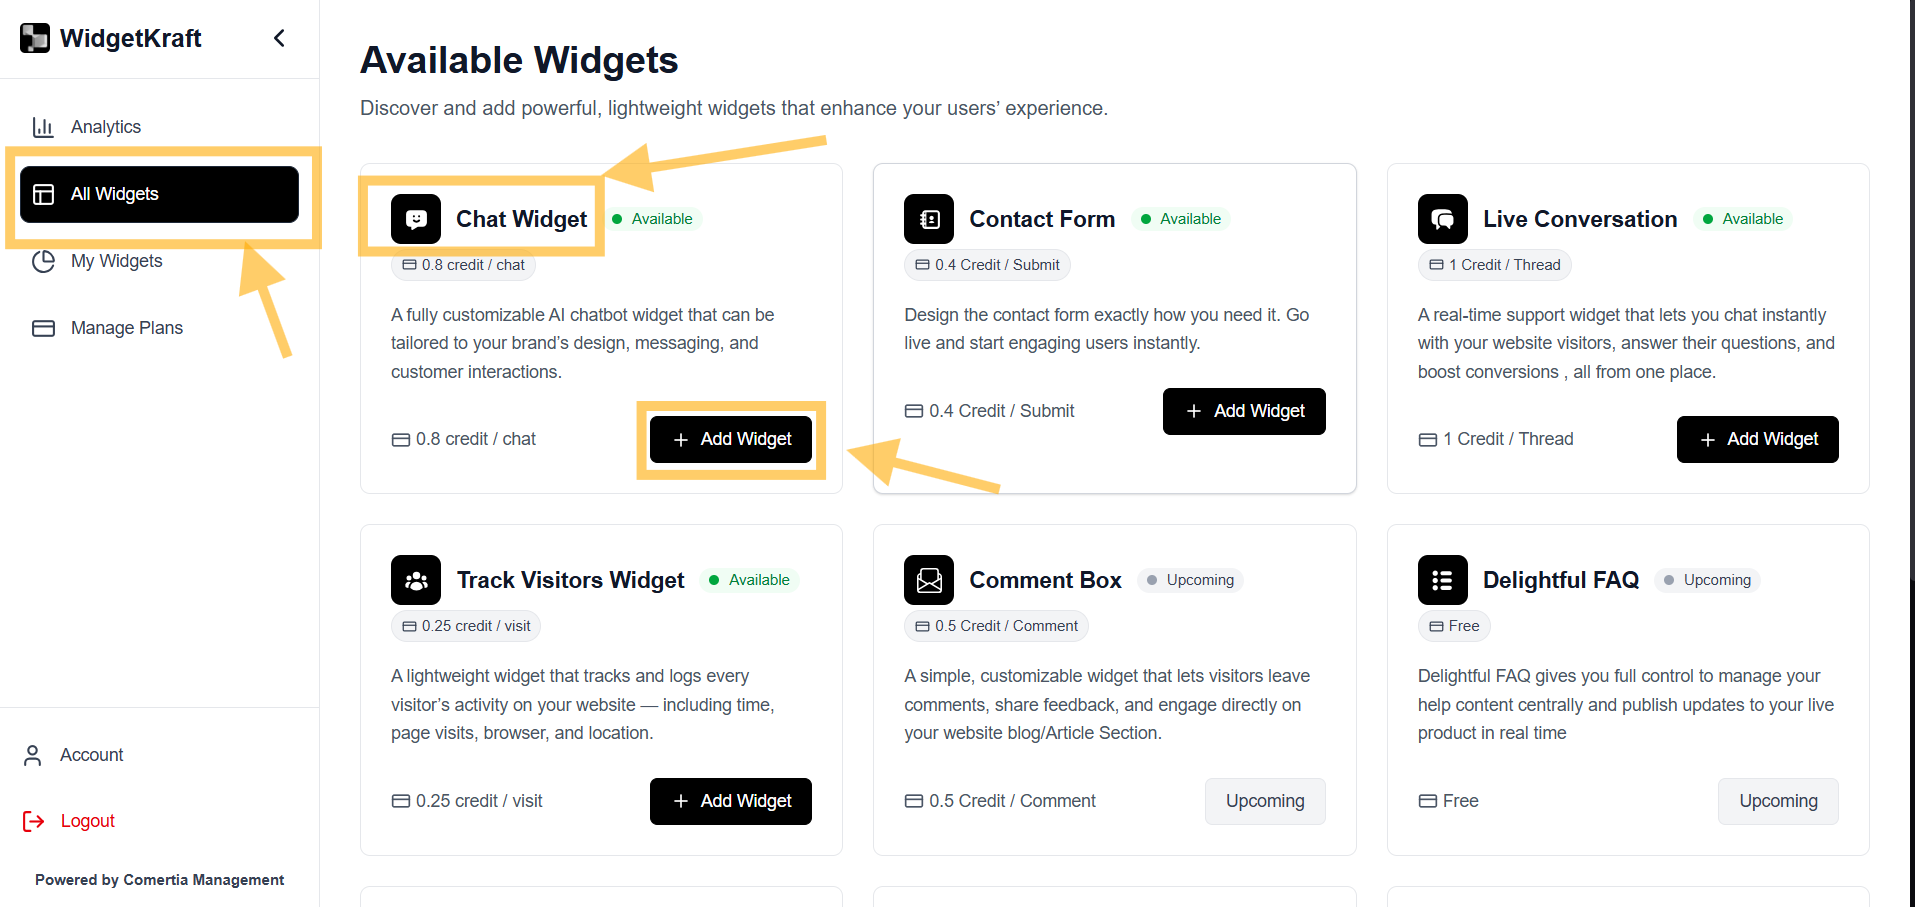
- 1Go to All Widgets → AI Chatbot
- 2Click + Add Widget
- 3Go to My Widgets → AI Chatbot
- 4Click Configure
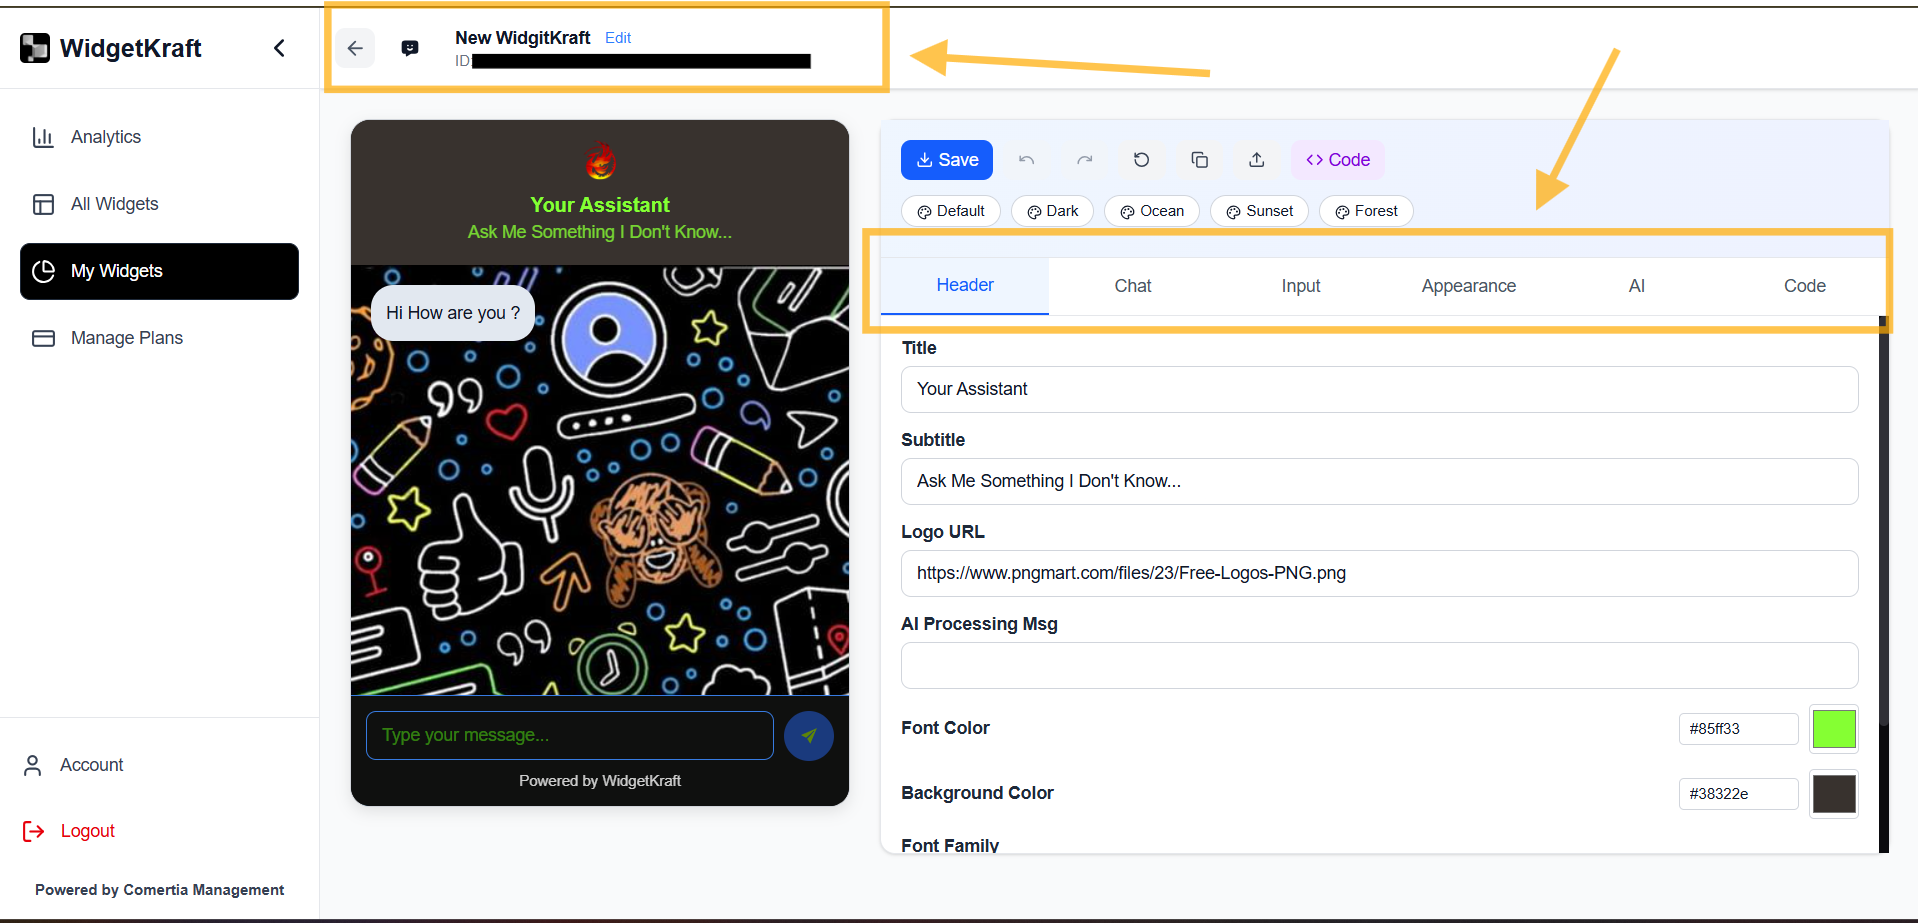
The chatbot editor opens with a live preview on the left and configuration panels on the right. Every change updates the preview instantly.
AI-powered intelligence
Your chatbot uses advanced AI to understand context, respond helpfully, and stay aligned with your master prompt.Understanding the chatbot editor
Six configuration tabs.
Header
Title and branding
Chat
Message bubble styling
Input
Message input setup
Appearance
Size and design
Code
Embed snippet
Header tab
Controls the top section of your chatbot widget.
Title
The name shown at the top of the chat window.
"Support Bot"Subtitle
Descriptive text below the title.
"Ask me anything…"Logo URL
Your brand logo or icon. PNG, JPG, or SVG.
AI processing message
Shown while the AI is thinking.
"Thinking…"Font color
Text color in the header.
Background color
Header background, to match your brand.
Font family
Typography for the header text.
Chat tab
How messages appear in the conversation.
Message bubbles
User bubble color
Messages sent by the visitor.
AI bubble color
AI assistant responses.
User font color
Text color for user messages.
AI font color
Text color for AI responses.
Bubble radius
Roundness of message bubbles.
18pxFont size
Message text size.
14–16px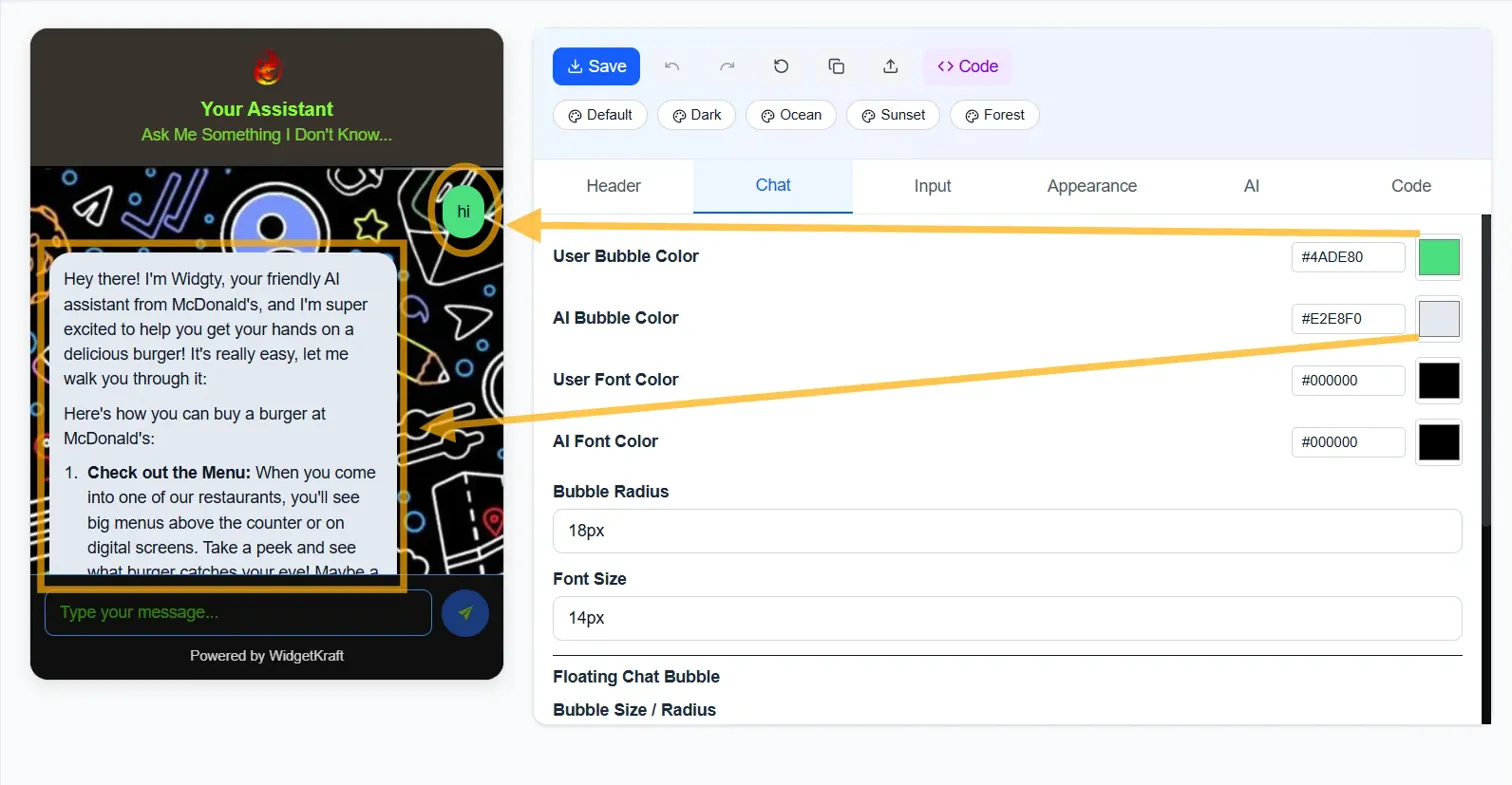
Floating chat bubble
Design tip
Use contrasting colors for user and AI bubbles so conversations stay easy to follow, and keep text contrast high enough to read comfortably.Input tab
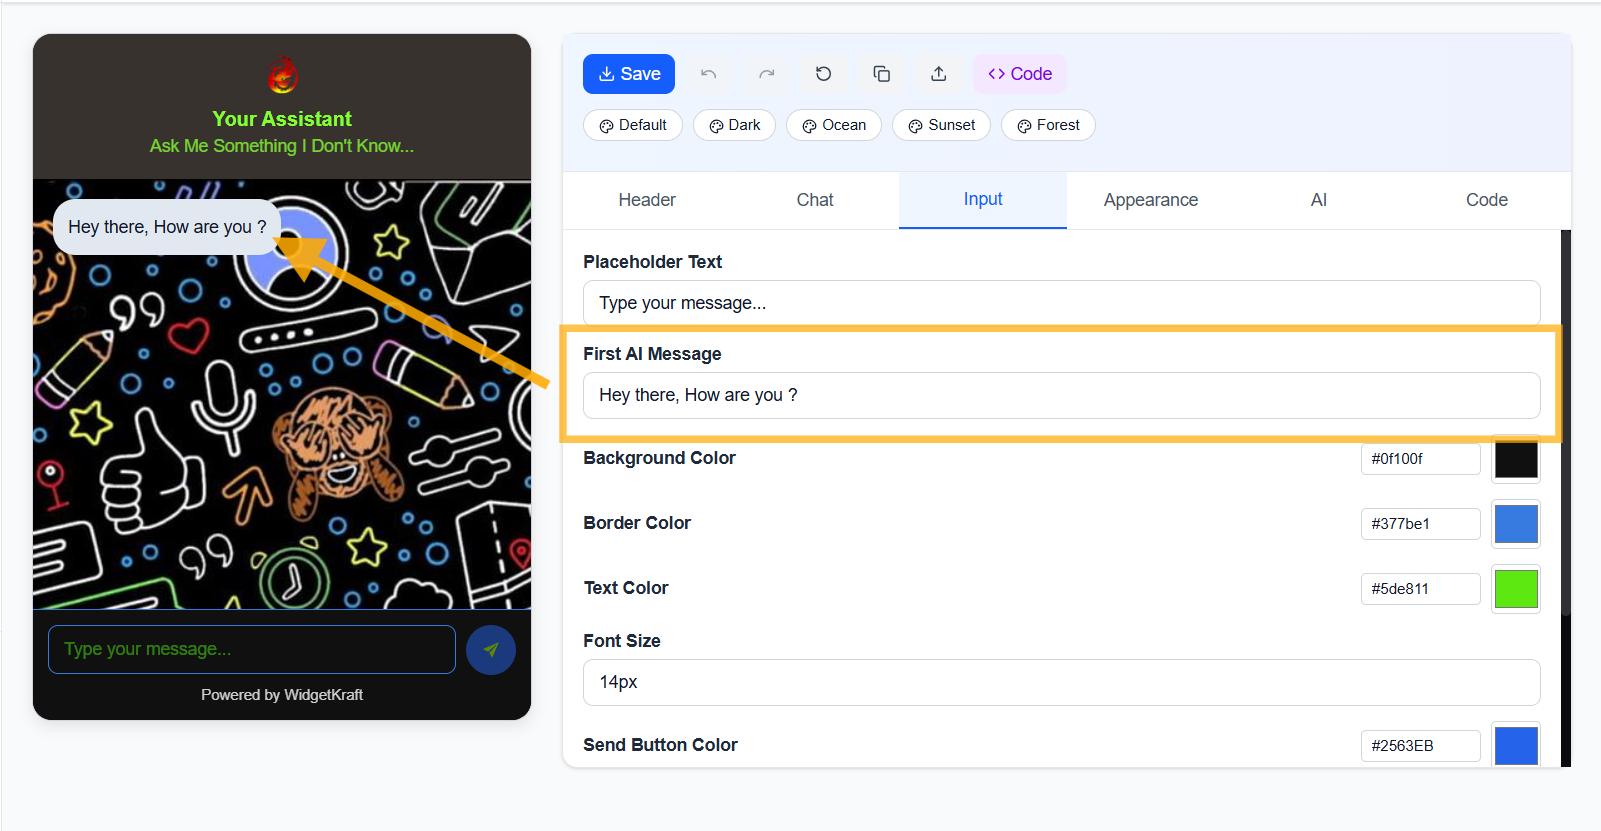
The message field where visitors type.
Placeholder text
Hint text in the empty input.
"Type your message…"First AI message
The greeting your AI sends when chat opens.
"Hey there, how are you?"Background color
Input area background.
Border color
Input field border.
Text color
Color of text as the visitor types.
Font size
Text size in the input field.
14pxSend button color
Color of the send button.
Appearance tab
Widget dimensions and visual style.
Width
How wide the chat window appears.
400px defaultHeight
Vertical size of the chat window.
550px defaultBackground color
Main chat area background.
Background image URL
Optional custom pattern or image.
Border radius
Roundness of the chat window corners.
16pxShadow
Adds elevation and separation from the page.
0 4px 12px rgba(0,0,0,.1)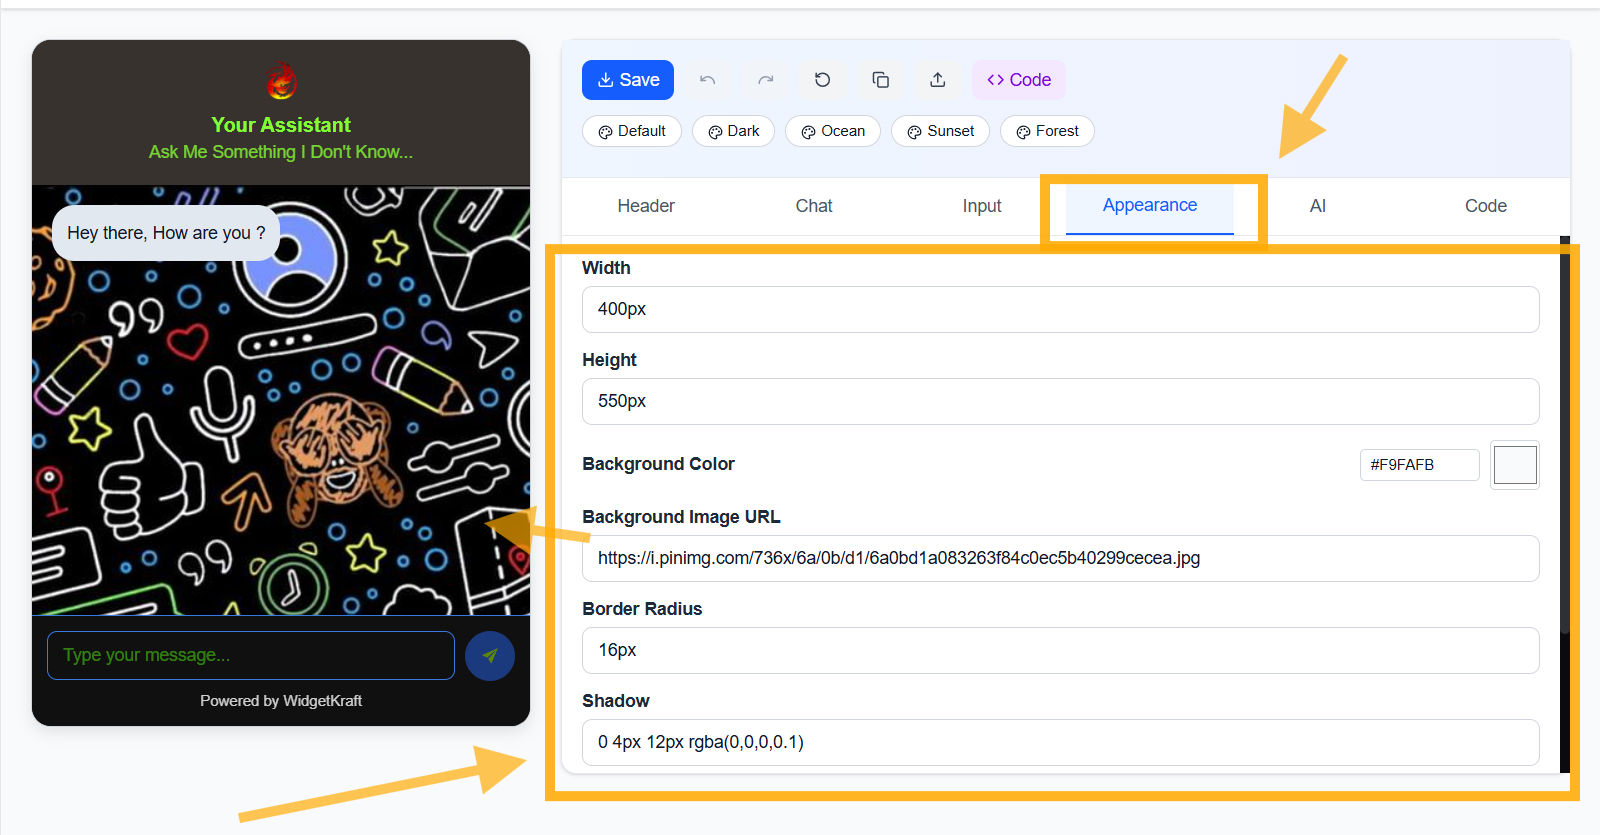
Theme presets
Pick a preset to instantly apply coordinated colors across every element.
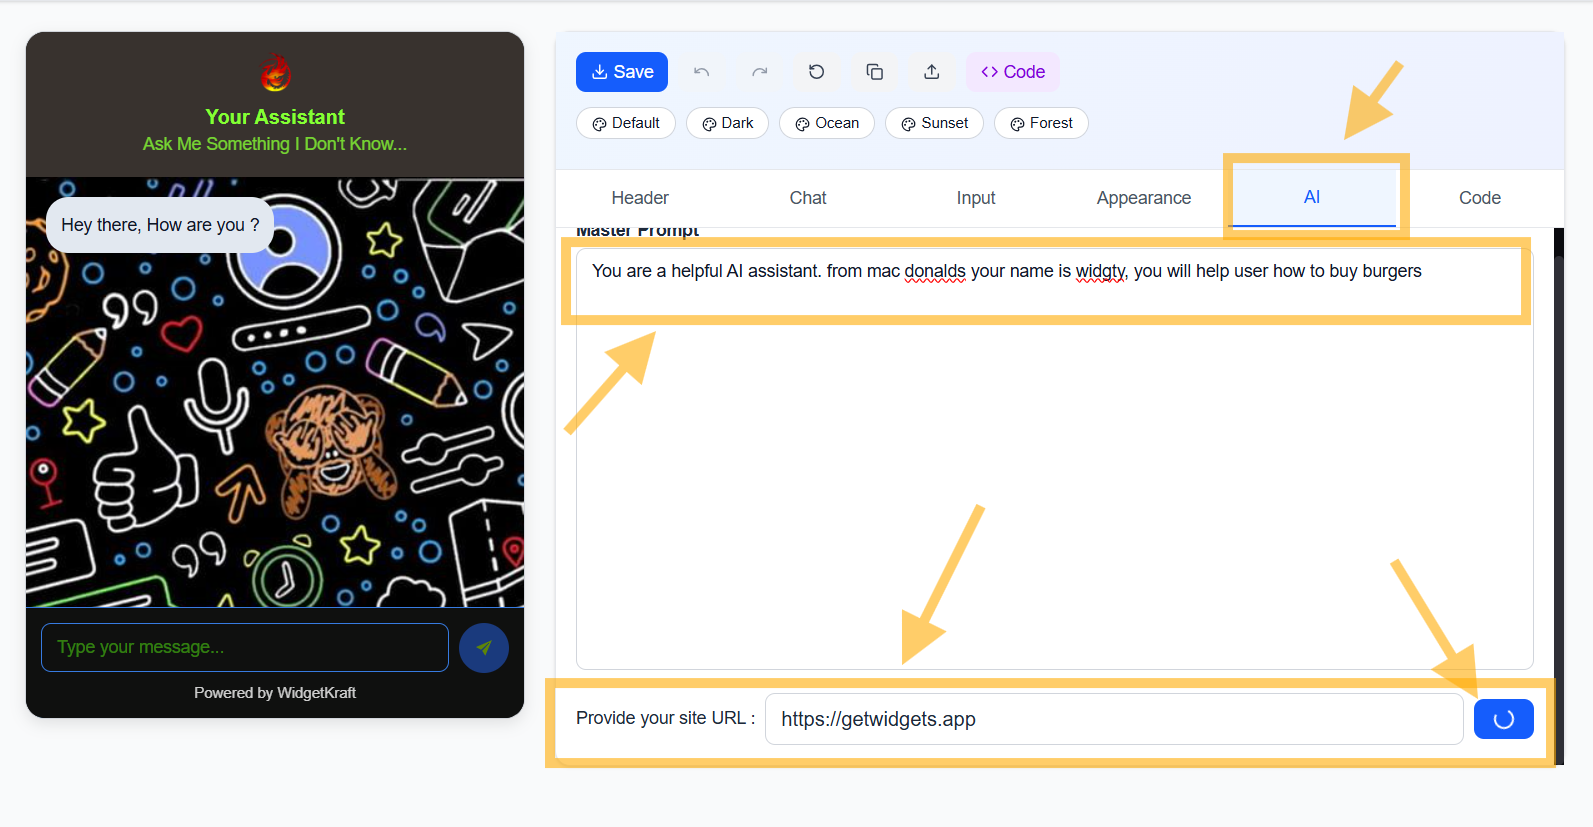
Knowledge Base
Define how your AI responds and what business information it can use.
Master prompt
This is where you define your AI assistant's identity, behavior, response style, and presentation.
- Who the assistant is and what brand or business it represents
- How it should answer, friendly, professional, concise, or detailed
- How replies should be styled and structured for visitors
- What business topics it should prioritize when answering
- Any rules, boundaries, or fallback behavior it should follow
Example master prompt
"You are the official AI assistant for our business. Answer in a helpful, professional, and easy-to-understand tone. Keep responses clear and concise first, then add more detail when needed. Use our services, pricing, policies, and terms as the source of truth, and avoid guessing when information is unavailable."
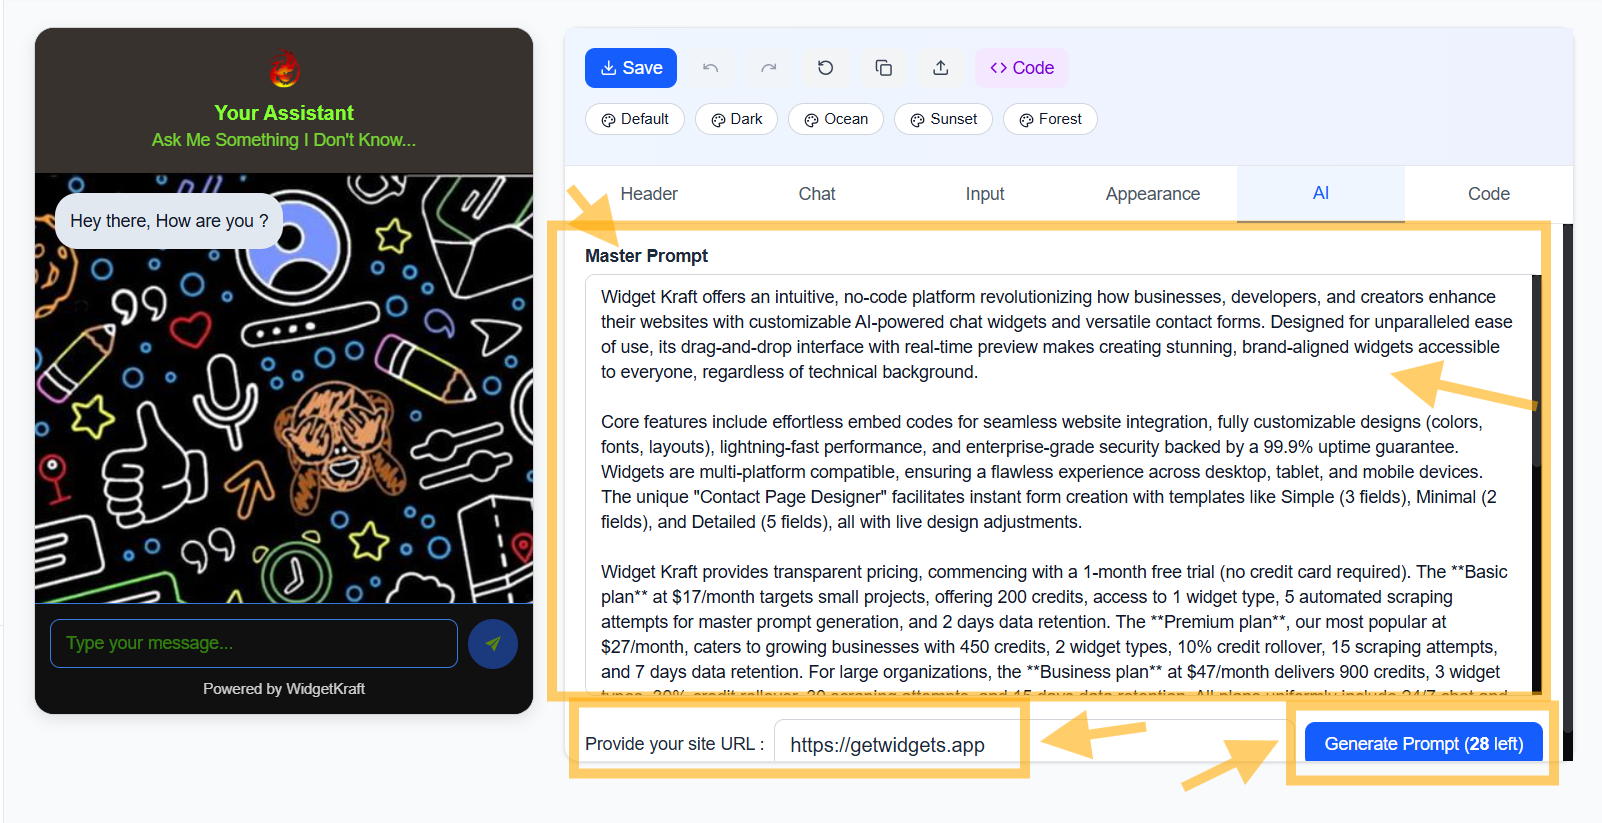
Knowledge sources
Add important business pages and URLs so the AI can answer with better context and more accurate information.
- Pricing pages and plan details
- Terms and conditions, privacy policy, and refund policy
- Product, service, and feature pages
- About, FAQ, support, and onboarding pages
- Any business-specific documentation the AI should rely on
The more relevant sources you provide, the more confidently your AI can answer questions about your business, services, pricing, policies, and customer expectations.
Prompt and knowledge base tips
- Describe the exact tone and answer style you want the AI to use
- Tell it whether replies should be short, detailed, persuasive, or support-focused
- Add pricing, policy, and service pages as knowledge sources
- Use real business information so the AI does not rely on generic answers
- Update sources whenever your offers, terms, or policies change
Code, embedding the chatbot
Once configured, copy the embed snippet onto your site.
<div id="chatbot-root"></div>

<script src="https://cdn.widgetkraft.com/chatbot.js"></script>

<script>
  ChatbotWidget.init({
    widgetId: "aaaaaaaa-7777-4545-bbbb-112233445566"
  });
</script>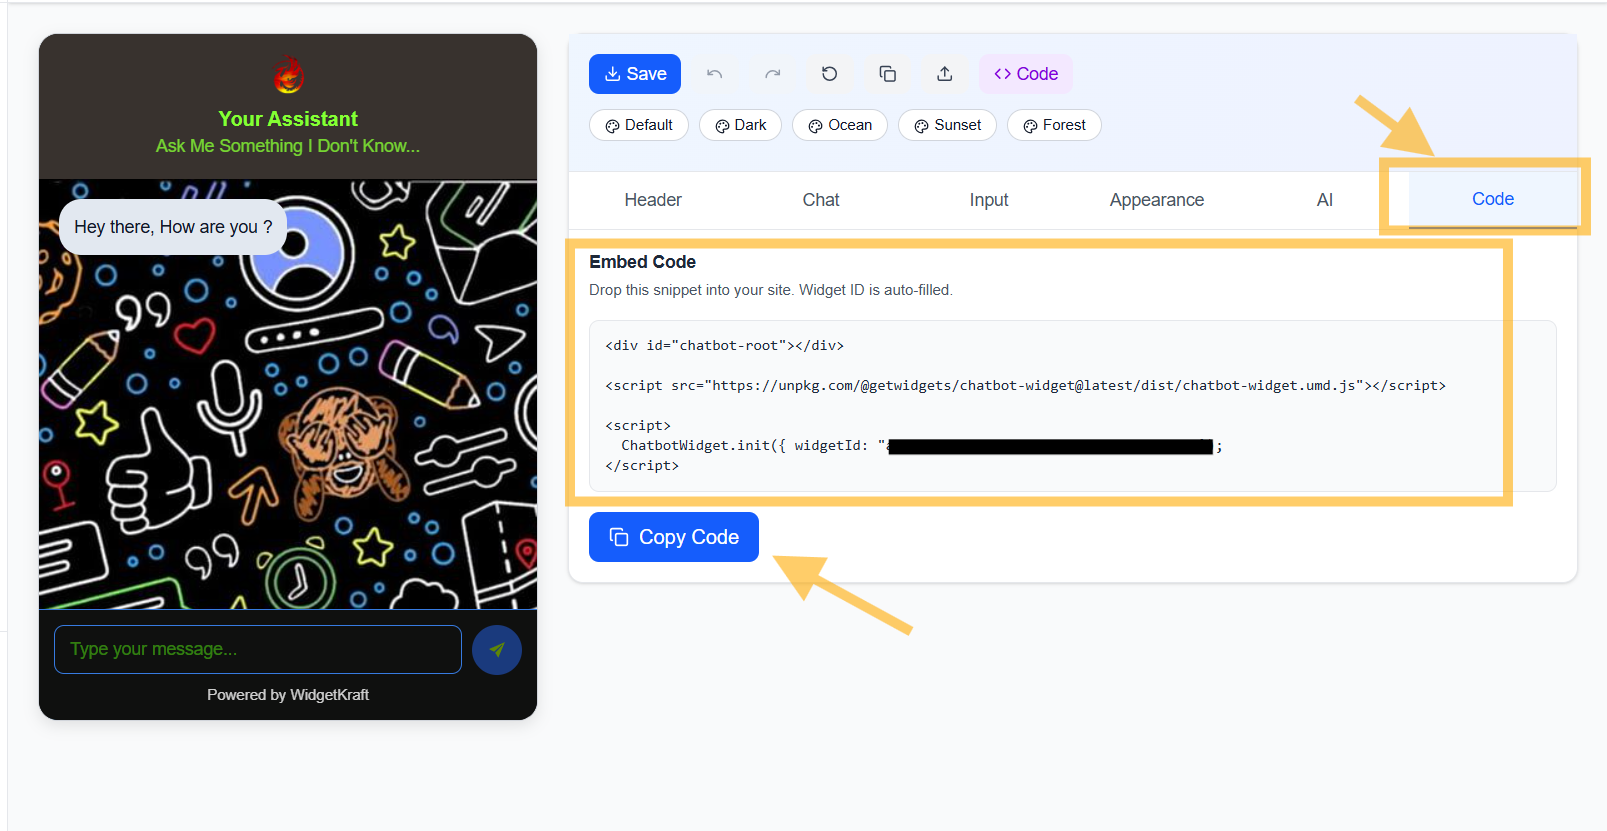
Using the embed code
- 1Click Copy to copy the embed snippet
- 2Paste it before the closing </body> tag, so it loads on every page
- 3The chatbot appears as a floating button in the bottom-right corner
- 4Visitors click it to start chatting with your AI assistant
Integration notes
No backend required
The widget is fully hosted and managed.
Instant updates
Editor changes apply immediately to live widgets.
Mobile responsive
Automatically adapts to every screen size.
Fast loading
Optimized for performance with minimal page impact.
Saving and publishing
- Click Save at the top to store your configuration
- Changes apply instantly to your live chatbot
- No need to update the embed code when making changes
- Your widget ID stays the same across updates
What happens during conversations
When a visitor chats with your assistant.
AI processing
Master prompt usage
Conversation history
Credit consumption
Best practices for AI chatbots
Write a comprehensive master prompt
Test your chatbot thoroughly
Set clear boundaries
Use your brand voice
Match visual design to your site
Monitor conversations
Summary
The AI Chatbot Widget lets you: